Thursday, September 15, 2011

Trip to the Rico Factory

This summer I was given the opportunity to take a tour of the Rico factory located outside Los Angeles. The staff was very kind and knowledgeable and they led me on a great tour including the history of Rico, the cane growing process, and allowing me to witness the making of the reeds. 


The process all starts at Rico's plantations, one located in France and another in Argentina. There they grow a specific, musically-suited cane known as Arundo donax from which will be formed all of Rico's cuts and styles.


The weather at the plantations is ideal for the cane and meets the requirements for moisture, cold periods, and sun exposure. All in all, it takes anywhere from two to four years for a stalk of cane to mature. Once this period is up, cane poles that do not meet the size requirements are removed by hand.


The cane is harvested in the winter while the cane is dormant. The harvest period lasts for 2-3 months and involves de-husking, sunning, drying, sawing, and storage.

A worker de-husks a stalk of Arundo donax. All of the "branches" are thrown out.

The cane poles are dried thoroughly to achieve their golden color. Rico is pioneering new ways to properly dry and sun the reeds. Their goals are premium quality cane and unparalleled consistency.

Here a worker checks the cane to be sure that it is fully dried. Only cane that has been aged properly will be shipped to the factory. 

The nodes of the cane are then cut off, leaving small segments behind. These segments are then bagged and shipped to Rico's factory in Sun Valley, California. 

Upon arriving in the factory the tubes are inspected and sorted by diameter and wall thickness before being split lengthwise into fourths. They are then fed into their respective machines to begin the reed-making process.
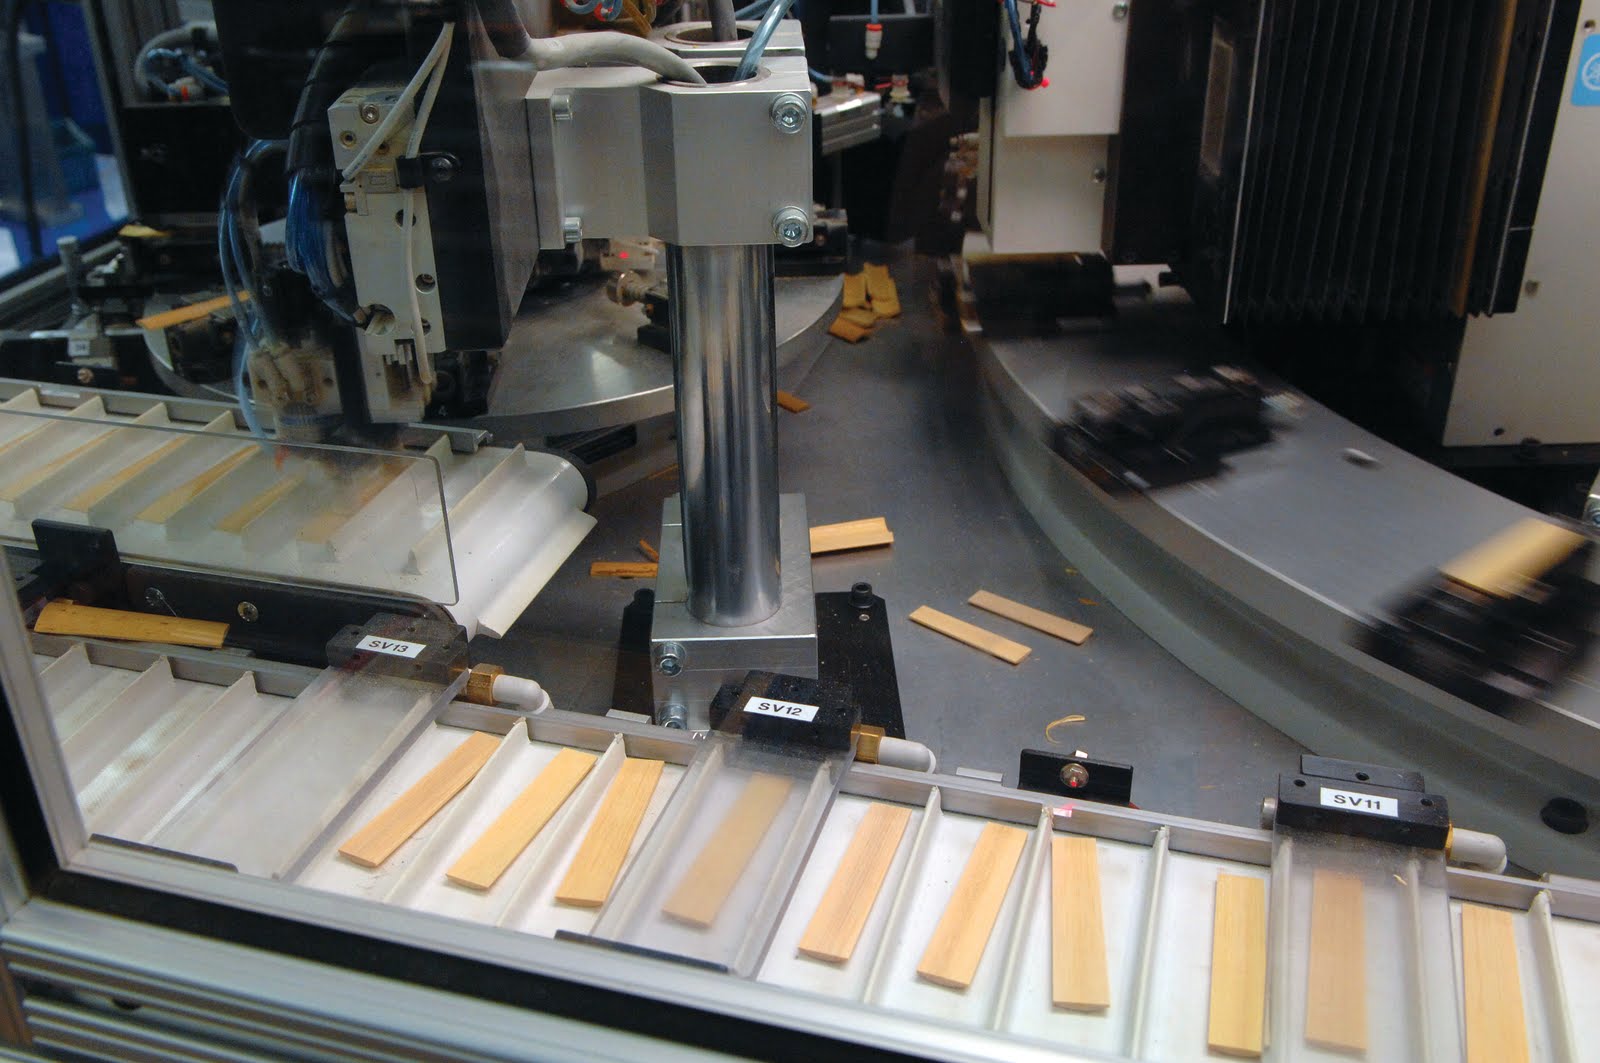
The first machine sands down the sides of the cane producing a basic reed blank. All reeds are checked by the machine for proper measurements. Those not within the accepted range are removed to either be re-sanded or discarded. 

After being sanded, the blanks are then fed into another machine which cuts the vamp into the reed. At this point the product is beginning to look familiar.

The reeds then pass through color video inspection in order to detect any visible flaws in the cane. Another series of measurements is also taken to make sure they meet Rico's standards. The blanks are then sorted by strength into various boxes to continue on to their respective finishing stations.

Next, machines with specially made diamond cutters are used to cut the reeds, one at a time. The diamond cutters provide extreme consistency in the cut, as they do not dull quickly like the metal cutters used by other makers. 

Here are the reeds fresh out of the cutter. After this they will go on to be measured and then packaged.

The reeds that come out of the cutter are constantly being measured for consistency and proper shape using points all along the reed. Employees keep a constant eye on the measurements, allowing them to compensate for any changes in either the cane or the machines.

Rico also has full-time musicians on staff to play-test finished reeds from each batch and offer feedback. Rico understands there are things that only a musician can feel from a reed and this helps them to produce a better product. 


The finished reeds are then put into their plastic cases by a machine at the next station. After this they are grouped into tens and then pushed into their boxes. All of the boxes are weighed before being sealed. They do this to be sure that each customer gets the right amount of reeds. If an anomaly is detected, an employee checks the box before putting it back on the line. After this they are sealed in plastic and then shipped to the warehouse. 

Below is some reed art that was displayed in the entrance of the factory. It also sums up the reed-making process pretty well. 

1. Tubes of cane arrive at the factory.

2. The tubes are then split into fourths.

3. The fourths are sanded and a preliminary cut it made.

4. The reeds are fully shaped, producing a finished product.

5. Reeds are placed into cases before being boxed and shipped. 
The tour was amazing and so were the people I met there. They are such incredibly passionate people who care about their craft deeply and are constantly looking to produce better products. It was inspiring and fascinating to see what it takes to produce that little piece of cane which is absolutely necessary to everything we do as clarinetists. They also have some new things in the works, but I am sworn to secrecy. 

Special thanks to everyone at the Sun Valley Rico Factory. Also, thanks to Trish Johnson, for helping me along and providing me with many of the pictures in this post, and to Josh Redman, for his help in scheduling the tour and his all around nice-ness.


And if you haven't seen this video already, here it is. 

Tuesday, September 13, 2011

Anthony McGill on Saint Paul Sunday

On the Saint Paul Sunday Website there is an archived recording of clarinetist Anthony McGill and pianist Natalie Zhu playing a few pieces. Among those performed are Poulenc's Sonata for Clarinet and Piano, Debussy's Premiére Rhapsodie, and Brahms Sonata No. 2 in E-flat Major.


" 'You know, this music takes you to another place—straight to your soul, straight to your heart,' says clarinetist Anthony McGill this week of Johannes Brahms's multi-hued second clarinet sonata. 'I started playing music because of that feeling.' "
-Saint Paul Sunday Website

Listen to the performance HERE

Martin Fröst playing the Copland Clarinet Concerto

A beautiful and unique performance by Martin Fröst with the DalaSinfoniettan. This performance took place at Vinterfest 2011 in Mora, Sweden.

Saturday, August 20, 2011

Play With a Pro Free Download


Play With a Pro is an online video store dedicated to providing informative, helpful videos to classical musicians of all levels. Their videos are more focused on the serious musician, but the concepts touched in them have value for all players. Their store has masterclasses run by several well-known clarinetists and teachers such as Yehuda Gilad and Charles Niedich. They also provide videos for others instruments featuring other great musicians such as Emmanuel Pahud and Hansjörg Schellenberger. Their musical library is always expanding, so you will regularly find new videos on their site.


They are currently offering a FREE download of a video featuring Hansjörg Schellenberger, former oboist with the Berlin Philharmonic, and Emmanuel Pahud, currently principal flautist with the Berlin Philharmonic. Now you may wonder how a video with an oboe player and a flute player can be helpful to a clarinetist. Well, the topic of this video is "Breathing and Blowing." All of the things discussed here and extremely relevant and important to the work we do as clarinet players, or as wind players in general. It's a great video, full of great info, and for FREE, you can't beat it.


Wednesday, August 17, 2011

New Clarinet Instructor at the Interlochen Arts Academy


Jeanmarie Riccobono, currently principal clarinetist with the Traverse Symphony Orchestra, will be taking over the clarinet department at the Interlochen Arts Academy this fall. She received her Bachelor of Music degree from the Eastman School of Music and her Master's of Music from Northwestern University.

More on her HERE.

Tuesday, August 9, 2011

Yehuda Gilad Masterclass


On Wednesday I had the opportunity to attend a masterclass run by Yehuda Gilad as part of the Clarinet-Fest. Below are my notes on the event.

The first player performed the beginning of the Copland Clarinet Concerto through the cadenza. Once she finished playing Mr. Gilad spoke about how every time he listens to a player he hears something. He's not always sure what it is, but it's something beautiful and unique. He likened it to a diamond.

He then told a story of how when he was young, he had a job working at a dairy farm. He said that in the old days they had to milk all the cows by hand, but that it was very good exercise for his fingers. He also, as one of the new guys, had the job of scooping manure.

He joked how it was not that different from his job now. He said it is the teacher's job to scoop away the manure (bad emboucher, slow fingers, etc.) so that their students diamonds can become uncovered. He then said how once it is uncovered, it is the students decision whether they will go and cover it back up, or continue to refine it.


Mr. Gilad suggested putting herself further into the piece as a way to calm her nerves. He said to evoke a memory, landscape, emotion, etc. to give the piece a meaning and purpose. He said to "imitate singing. NEVER imitate playing." He pointed out that as we train our ears to listen for good sound, good intonation, etc. we in turn train our ears to run our air support.

Mr. Gilad compared our air streams to the hose in his backyard. He can turn it on high or he can turn it on low, but the pressure of the water remains consistent and unchanged no matter where he aims the hose. He said our air streams need to be just as consistant.


To illustrate the air stream, Mr. Gilad had the student blow through a coffee straw, sometimes articulating with the passage, sometimes just blowing. He called it "laser beam air." He said there should always be a point to the air. He put his hand at the end of the straw and felt the point of air and tried to get the student to create that same point without the help of the straw. It also showed the student how it should feel if he was supporting properly.

He then gave the student an exercise. He called it the Reference Point Exercise.

Reference Point Exercise


For this exercise you must first choose a scale. The example in the graphic is C major. Start on the lowest C, your reference tone for this scale, and hold it until you feel you are playing with your richest, fullest tone. Then proceed to play the rest of the scale up and down slurred. When you land back on the lowest C, hold it again, waiting for your best tone. This exercise should also be done in reverse, using the high C as a reference tone. Repeat the exercise cycling through mezzoforte, forte, and piano. You are going for perfect legato; a completely fluid scale without small accents, crescendi, or diminuendi. 


Later on a girl played the cadenzas from the Nielsen Clarinet Concerto. Mr. Gilad said that we should never play cadenzas faster than we can sing them in our minds. "Patience is beautiful."  For the areas of fast tonguing he offered a different way of looking at articulation. He said while many of us think of tonguing as the tongue pressing forward into the reed, it's actually the tongue reflexing to the reed. If we think of the motion as pulling our tongue back and letting it reflex at the reed, we are able to articulate easier and better. To illustrate this he had the girl play a passage of fast tonguing while walking backwards. It produced impressive results and helped to emphasize that the tongue is moving backwards, not forwards. 

He also adressed intervals. He said he likes to think of big intervals like the following graphic. The black note is the one before the leap and the black line is the note after the leap. 


He said that the blue shape should be the shape of the inside of our mouths when we are making big leaps. He also said that when we face intervals larger than a 4th we need to put weight on the note before the leap. He said it's like a trampoline. The more you sink in, the higher you go. 

He went on to ask the student what it took to play the clarinet. The student replied, "You have to blow." Mr. Gilad took the clarinet and blew very hard, but no sound came out. He looked at the student confused, asking what else he had to do. The student made suggestions, but none were what Gilad was looking for. He said he liked to call it the "Duh Rule." "Blow and don't restrict. That's it!" He proceeded to have the student blow air through the clarinet without making the reed sound. You could easily ear the air moving, but no notes. It took a very loose jaw and lip to do this, but it helped to loosed the biting and improved the sound a lot when the student tried it. 


Mr. Gilad then outlined the things he thought were important to be a great musician and clarinet player. He put them into three sections. 

Section 1
Articulation
Intonation
Rhythm

Section 2
Balance
Blend
Style

Section 3
Conviction
Communication 
Consistency (discipline) 
Initiative 

The class was incredible and very inspiring. I know I missed a lot in my notes, but I hope this gives some insight into his methods and approach to the clarinet. If you ever have the chance to take a lesson or see a masterclass, definitely take it!


Robert DiLutis on Adjusting Reeds


Figure 1
Some issues you may encounter are below, along with some ways to remedy them.

Stuffiness - The tip of the reed (Zone 1) is too thick.

Brittle, Buzzy - The tip of the reed is too thick (zone 1, figure 1). This is opposite what the initial thought would be. The buzziness comes from the heavy tip slapping into the mouthpiece.

Heavy, Dull - There is too much heart. Be careful when working on the heart. Only take away in small bits. Once it's gone, it's gone.

Stiff - Taking some material away for zone 2 (figure 1) can make it easier to blow.


Figure 2
Working on the Tip - Zone 1
Take a piece of 600-grit sandpaper and fold it in half and then in half again to create a square with a stiff corner. Next, wet the sandpaper and reed with saliva then proceed to to scrape away at the tip. Use very little pressure and push towards the tip and off onto the glass. Do this about 20 times across the tip. (Figure 2)


A good reed should have a tip thickness somewhere in the range of .003 - .005 inches. Unfortunately most commercial reeds have tip thickness from .005 - .009 inches.

When working on the tip, it's important to get the shaving right. You don't want to sharpen your reed into a knife (figure 3), rather create a thinner tip, while maintaining                                       the slope. (figure 4)

Figure 3
Figure 4

Mr. DiLutis suggests to have a reed case with 8 reeds that are concert ready. The reeds you just broke in will go into a “dry bag," once again, case-less. These are reeds that will take the place of your select 8 as they slowly die away. Be sure to play on each of the select 8 every day in order to keep them conditioned and ready for a performance. Mr. DiLutis says that commercial reeds seem to last an average of 30 hours of playing.